Photo Background
Don’t let everyone see you haven’t had the energy to tidy up 😉 place a nice (uncreased!) white or light coloured sheet/fabric under your crafts. If your item is light coloured you might want to choose a darker background so it doesn’t get lost on a light background. You can buy fabric background for photography on eBay. Free wallpaper samples also make great backgrounds or I’ve heard placing your product inside a bath works well too! If you want to use props to add interest, be careful you don’t go overboard as sometimes they can distract or confuse customers as to which item you are selling!
Lighting
Think about lighting, this might be stating the obvious but photos that are well lit allow customers to see your makes better! Some Crafties own a light box (you can purchase kits quite cheaply on eBay). If you’re able to get out, try taking photos outside in natural daylight. If you aren’t able to get out and don’t own a light box, a daylight craft lamp pointed at your crafts does a really good job. Avoid shadows if you can.
Here’s a nifty way to make your own light box:
Take SQUARE photos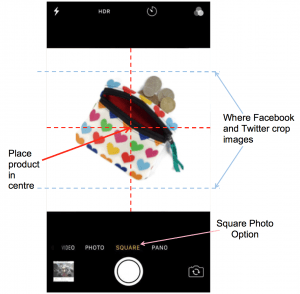
This is very important… all images on Conscious Crafties (and most other selling platforms) crop your images to squares so they all look pretty and uniform on the website. If your image isn’t square it will automatically get cropped from the centre point so think about that when taking your photo as you wouldn’t want part of your image being chopped off! Some phones/cameras have an option to take SQUARE PHOTOS, if not, there’s a few FREE apps that can help (InfranView, Pic Monkey, Paint.net). Alternatively, take your photo from further away so when it does get cropped into a square, it doesn’t crop your image and instead crops the area around your product. Make sure you place your product right in the centre of your photo.
What Social Media Does to your Images!
Think about how your product will look when sharing on social media. Facebook and Twitter have a habit of cropping the top and bottom off your featured image. So always make sure there is additional space at the top and bottom of your featured image, so if it gets cropped, it’s not your product that gets cropped but the background. Also Facebook require images to be at least 200 x 200 pixels in size, so if your product image is too small it won’t appear when sharing on Facebook.
Watermarks?
If adding watermarks on your images, ensure they are really faint and don’t cover your product.
Pretty Frames?
Adding frames/borders/effects around images distracts from your makes and gives you less space to show off your item.
Collage Images?
Your featured images should show off your product really well. Use the gallery for any additional images rather than squashing multiple images into a collage. When customers browse the website they will see thumbnail images before clicking onto your product page, so think about how a collage will look when it’s tiny.
Product Image Size Requirements
If you have large product images you will need to reduce the file size before uploading to ensure your customers aren’t waiting for a big image to load.
Lots of people get confused about the difference between image file size and image dimensions:
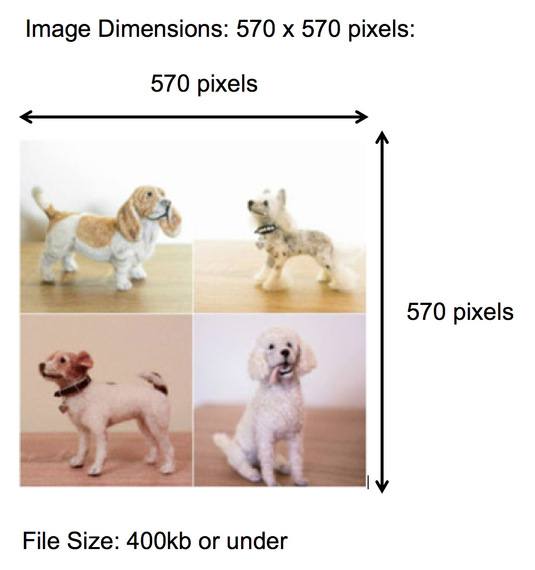
IMAGE DIMENSIONS – 570px X 570px (width and height, in pixels):
This is the image QUALITY.
All product images must be square and be 570px X 570px
This allows for optimum crispness on the website and when sharing on Facebook.
WARNING: Please don’t use images with a higher or lower resolution. For your images to appear on social media when sharing your product links, image resolution needs to be at least 200 x 200 pixels. So please use 570px x 570 px.
IMAGE FILE SIZE – 400Kb or under (Kilobytes KB or Megabytes MB):
This is how BIG your file is. If you download images that our too BIG, this will cause your product page to take a long time to load (testing customers patience). Most image file size will be reduced enough if you have changed the resolution to 570px x 570px as above.
All product images on the site must be 400Kb or under.
Many fancy cameras will produce image file size of between 4Mb to 10Mb and beyond!
Reducing Image Resolution
All product images MUST be 570 x 570 pixels. There are many FREE and easy apps you can download to your phone. Simply search in your App Store for ‘Image Resolution’ and you’ll find lots! We’ve used an app called ‘Image Size’:
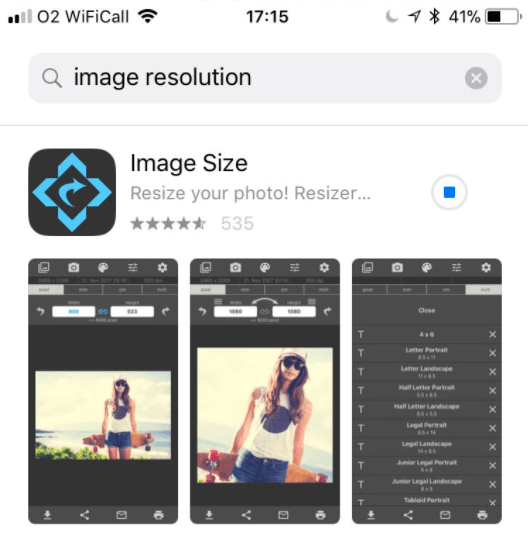
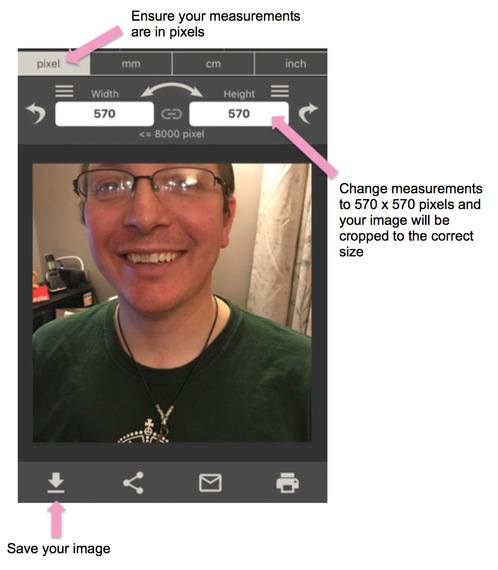
Once downloaded, open app, open a product image from your library, then change the resolution to be 570 x 570 pixels
Save photo, job done 🙂
Our Connie shows us how easy it is to resize images using Paint
(please use 570 x 570 pixels not 600 as in video)
Reducing Image Size
If you also need to reduce the file size and are familiar with emailing pictures, you will notice that it gives you the option to reduce the file size. So emailing images to yourself is a good easy way of reducing file sizes.
Other options are:
-If you use a Mac: open image in Preview (use Tools, Adjust Size and then Export to save as a JPG).
-If you have a Windows PC: open image in Paint (click the Home tab then Resize button)
-Phone Apps: Search ‘Photo Compress’ in your App Store and you will be given lots of great free easy to use tools.
Easy Tip for Resizing Lots of Images (Windows)
What’s a Great Photo?
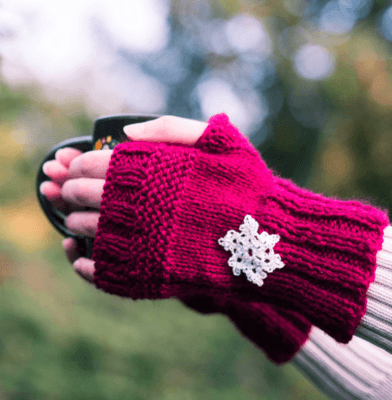
As an example… I LOVE this photo, Gracey’s brother took it and her gloves look incredible (I just had to buy a pair!).
Props don’t always work but when products are useful it’s great to show them being used. The reasons this image is so wonderful is because it helps the customer visualise themselves using the gloves on a cold day with a cup of something comforting and warm. The background has been blurred out just enough so you know it’s outside yet nothing is distracting the customer away from the gloves 🙂 It’s always worth picking up some photography skills as they are your NO.1 SELLING TOOL!
Want Professional Help?
Our Craftie Claire Hewitt has found a professional product photographer who has been kind enough to offer Crafties 10% off his normal price. Go to Craft Jewellery Photography
Hope that helps x
